 |
| Pic Microcontroller Introduction |
What is PIC ?
It’s a Programmable IC that follows simple instructions. Manufactured by " Microchip .inc "
How to program a PIC?
Before programming a PIC we need some basic things. let’s talk
about them.
Programmer (Hardware)
We are using a programmer to connect the PIC to computer Via
Serial Port or Via USB port and program the mictrocontroller IC or chip .
There are many types of Programmers (PIC kit ,JDM ,Pro PIC, ect ). You can find them in a local Electronic store or you can search and download
the circuit Diagram and make a PCB. I brought a PCB of a JDM programmer it
cost me only $2 . To connect the JDM programmer with the PC we need a Serial
cable .Make sure
that every pin on the female side of the cable is connected to the male side in
orderly.Because some cables have crossover connections ( Tx and Rx pins ) .Some programmers have jumpers so that they can be used with both types of cables.
For a a JDM programmer we only need the pin 3, pin4, pin5, pin7,
pin8. This is my JDM programmer it works fine and it supports up to 16f877 Microchip .
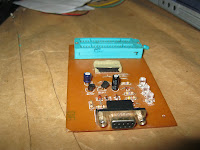 |
| JDM programmer with serial port |
 |
| JDM programmer with serial port |
If you don’t have any serial port ,Then you have to buy a USB
programmer such as PIC kit2 .It will cost you around $20.00 .Here is both JDM programmer and Usb programmer.
 |
| USB Programmer vs Serial Programmer |
Warning - before soldering the Programmer make sure every
component is checked with the multi-meter and place every component in right order . If not it may damage
your computer or it's Port.
 |
| 16f877A and 16f876A Microchips |
Compiler programs
The next thing you need is a Compiler program .There are many of
them. High level langues are making coding easy. But it didn’t give you much
control of the process. So my Recommendation is to use Assembly level langue such as MPLAP IDE .It will take some time and
not that easy to code but believe me it’s the best way for coding .so in this
tutorials I’m using MPLAB as my Compiler. Feel free to use other Compilers too.
And ask your self what is the best.
Assembly language -
*.MPLAB IDE – (PIC Assembly langue)
High level language -
*.HITECH C - (similar to C langue)
*.MICRO C (similar to C langue)
*.MICRO Basic (similar to Visual Basic langue)
*.CCS (similar to C langue)
*.JAL (more like Pascal)
IC Programmer
After compiling our program we have to write the program in the
PIC's memory .In that case we have to use a IC programmer Software. There
are many of them such as PIC kit programmer, IC-Prog programmer .
Demo board
Now we have every thing for our work, But after the process there
may be errors .We need a way to check the funtion .The best way to check is by using a demo
board .you can make your own demo board or buy a one around 40 Dollars . My
recommendation is make your own one .This is my Demo board. It only cost me 10 dollars
.I will tell you how to make your own Demo board.
 |
| Pic Microcontroller demo board |
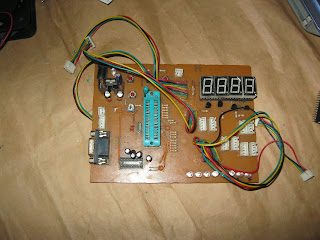 |
| Pic Microcontroller demo board |
Let’s take a look at some of the things inside a PIC
Registers
There are two type of registers inside a pic
- Special function registers.
- General registers.
I explain about this in future lessons.
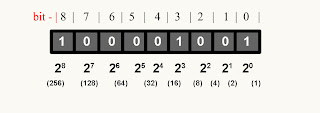
Inside PIC16F876A there are 512 Registers. Register is one Byte
.byte content’s 8bits .So register have 8 bit’s. you can put 256 numbers
(0-255) to a register.
Banksel
There are four Banksels inside PIC16F876A PIC. Each Banksel content’s
128 Registers.
Ports
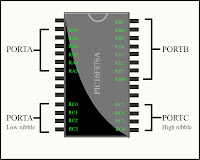
Port is a special register .bit’s of a Port are connected to the
pins. So we can use these port’s to
output or input our data .PIC16F876A have 3 Port’s.
- PORTA - 6bit ( RA0-RA5 )
- PORTB - 8bit ( RB0-RB7 )
- PORTC - 8bit ( RC0-RC7 )
 |
| PIC Microcontroller Ports |
TRIS Register
Every bit’s of a port are connected with a TRIS registers Bit’s
.we use TRIS register to tell the micro controller that what are the input’s
and what are the output’s are .
 |
| TRIS Register |
PIC Memory
There are two type of memory inside a PIC.
- RAM memory
- ROM memory
We use ROM memory to store data for permanently. In case of
power lost or reset of the PIC data will be saved. Ram memory is not permanent it will be lost
in a case of PIC reset .
Pin-Out
Here is the pin out (I will Explain these later)
Take a look at this Table
Power
From this point to forward I will use Microchip 16f876A to Explain
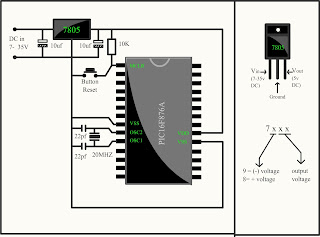
things. 16f876A needs DC 5v input voltage. If you have a power supply between 7v and 35v you can simply use 7805
Regulator IC to decrees the voltage .if you have a AC power adapter use a
Rectifier circuit and make it DC and connect it to 7805 .make sure the input
voltage is not more than 5v.if it is higher than 5v it will damage your PIC
Oscillator
We can use a Oscillator up to 20MHZ. The
speed of a PIC depend on the Oscillator that you are going to use . You can use the programmable internal oscillator inside the PIC or you can use a external oscillator .
Minimum requirements
 |
| Minimum requirements pic16f876A |

