Are you tired of looking for an animations for your pixel LED project and looking for a 3rd party software to create an animation? . What if I tell you that you don't need any 3rd party software to create an animation . You can create a custom animation in LEDEdit-K software .Of cause ,This is not for advance animations but for simple effects this is the best way to create an animation since it's quick and easy .The most impotent thing is that it doesn't require advance knowledge in CGI .In this tutorial we will discuss how to create a custom animation in LEDEdit - K software.
Watch This Tutorial on YouTube
1.0 Run LEDEdit -K and Create a new project .
2.0 Create a layout . (for This tutorial I'm going to create an 50x50 pixel LED layout using auto layout creator ).
3.0 Go to "Program" tab and select the program from the list and click on "Custom" tab.
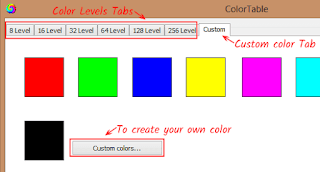
In custom tab you can create your own color set to be displayed in your animation effect (default color is white ) .To create a set of colors click on "Color Palette" button .Which will bring up the "Color Table" window .
 |
| Custom animation color table |
COLOR LEVELS
There are several options when its come to selecting color you can go through different color level tabs (8 level , 16 ,32 ,64 ,128, 256) to select colors If you are using color level tabs to select a color click on the color level tab and select the color then click on "Add to color palette" button .
CUSTOM COLORS
If you can't find the color that you are looking for in color level tabs ,You can use the custom color palette to create your own colors.To create your own colors -
 |
| Custom animation Color creator |
4.0 Go to "Custom" tab .
4.1 Click on "Custom Colors" button .Which will bring up the custom color window .
4.2 Then click on "Define Custom Colors" .Which will expand the custom color window .
4.3 Click on the color selection area that you want and use the brightness slider to change the brightness of the color that you have selected or you can input the R,G and B values of your color in the color value input fields .You can also input the Hue ,Saturation and Luminance values to the related text fields .The color that you are at will be displayed on "Solid Color" square.
4.5 Once the color is obtained click on "Add To custom Colors" button and click "OK" .You will see the color that you have created has been added to the custom colors list .Select that color and click on "Add to color palette" button .
4.6 Click on "Close" button .
4.6 Click on "Close" button .
COLOR GRADIENTS
You can also create two color gradients . To create color gradient -
 |
| Custom animation color gradient |
5.1 Click on custom tab in color palette window .
5.2 Click on "Start Color" and select the right side color of the gradient or click on "Define colors" button to create your own color as in the previous step .Click "OK" .
5.3 Click on "Ednd Color" and select the end or the left side color of the gradient .or click on "Define colors" button to create your own color as in the previous step .Click "OK" .
5.4 Type the levels of change that you want inside the " Numbers" text field.
5.5 Click on big "OK" button . Then click on "Add to color palette" button to add it to the color palette.
5.6 Click on "Close" .
To remove the colors in the color palette click on "Clear" or if you want a single color segment removed from your palette click on the color segment that you wants to delete and click on "Delete The Selected Color" button.
5.6 Click on "Close" .
To remove the colors in the color palette click on "Clear" or if you want a single color segment removed from your palette click on the color segment that you wants to delete and click on "Delete The Selected Color" button.
ANIMATING
Reset - Reset the animation .<< (B) - Go to the previous frames .
Continues Adding - Add/Record frames contentiously .
Continues Preview - Preview/Skip frames contentiously (Without recording).
Single Frame Adding - Add frame by frame.
Single Frame Preview - Preview frame by frame.
Now we have selected the colors for our animation now its time to animate .There are several effects available .
 |
| Custom animation settings |
6.1 Select the animation effect from the list .
6.2 Select the direction of the animation using direction buttons. (Direction buttons not available for "Overall change effect" ).
6.3 To record and play the animation click and hold the "Continuous Adding" button .If you want to add or record frame by frame click on "Single Frame Adding" button.
Since every animation starts from the beginning it fills a black background .To avoid this click and hold left mouse button on "Continuous frame adding " button until the animation fill the layout then proceed to click on "Continuous Adding" . You can skip the animation by clicking on "Continues preview" or "Single frame adding" buttons . You can reverse this action by click on "<<(B)" button .
FREE HAND
You can also draw things on frames using the Freehand tool . |
| Custom animation Freehand |
7.1 Select a color or colors using "Color Palette" and select an animation using the effect list .
7.2 Click on "Single frame adding" to add frames .
7.3 Select the frame that you want to draw using the frame slider .
7.4 Check "☑ Freehand"and select a color or click on"custom color" button and select a color .
7.5 Draw on layout by dragging your cursor while pressing left mouse button .


No comments:
Post a Comment