
LEDEdit-K is one of the most popular software when it comes to Pixel LED programming.It has very useful features . The text effect feature is one of them.You can show customized text on your panels without using any 3rd party software .In this article, I will show you how to use this feature for your pixel led projects .
Watch This Tutorial on YouTube
In this article I'm not going into the basics ( Creating projects, Creating layout, Recording videos) of LEDEdit-k versions. So ,If you are new please checkout my [ Tutorial on LEDEdit -K Basics ] and comeback to this tutorial .
FIRST THINGS FIRST
As described in my [ Tutorial on LEDEdit -K Basics ] tutorial , Crate a new project and create the layout .Select the program from the program tab .
THE BACKGROUND
If you are planning to have a single background color instead of an animation please proceed from second step.
In order to display the text there should be a background effect.
01 Go to "Effect" tab and select a animation from the libraries or click on "Open Video" and select a video or an animation from your PC and click on "OK" .Now you can see the animation or the video is playing in the background.
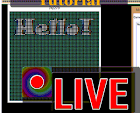
02 Click on "Enter Text" button .
 |
| LEDEdit-K text effect window |
03 In the Text effect window click on and check the "☑ Enable Text Input" check box. Type the text that you wants to display in the multi-line text field .Now you can see the text effect is playing on the layout .
04 To change the font color and font type click on "Font type and color" button .Which will bring up the font format window. Select a font type from "Font type" list , Select a font style from "Front style" list ,Select a font size from "Font size" list and finally select a font color from "Font color list". Check the check boxes if you like to underline or strikeout the text.finally click "OK" .
05 If you want a outline around the text check "☑ Outline" and to change the color of the outline click on "Outline color" button and select a color for the outline .
06 To change the scrolling animation speed left click on the speed slider and move it towards the right .If you want still text without scrolling move the slider all the way right .
07 Use the Horizontal position and vertical position sliders to change the text position .
08 Chose a method by clicking on "⨀ Monochrome" or "⨀ Full color" radio button .
⨀ Monochrome - This will make your text as mask layer on top of your background animation.
⨀ Full color - Full color allows you to have the single color text on top of the background animation.
09 You can change the direction by clicking on "⨀ Vertical Scrolling" or by clicking on "⨀ Horizontal Scrolling" radio buttons . If you select the "⨀ Vertical Scrolling" , You have to move the "Horizontal position" slider all the way left in order to see the text" .
10 If you are not using a background animation you can select a background color by checking "Background Color" check box . Select a background color by clicking on "Background Color"
button and selecting a color from the palette .
Click "OK" button after your customized your text effect. Now click record the text effect [How to record in LEDEdit-K]. Export the effects to your SD card and plug it into your controller [How to export LED Effect in LEDEdit-K]
 |
| LedEdit-K font format window |
04 To change the font color and font type click on "Font type and color" button .Which will bring up the font format window. Select a font type from "Font type" list , Select a font style from "Front style" list ,Select a font size from "Font size" list and finally select a font color from "Font color list". Check the check boxes if you like to underline or strikeout the text.finally click "OK" .
05 If you want a outline around the text check "☑ Outline" and to change the color of the outline click on "Outline color" button and select a color for the outline .
06 To change the scrolling animation speed left click on the speed slider and move it towards the right .If you want still text without scrolling move the slider all the way right .
07 Use the Horizontal position and vertical position sliders to change the text position .
08 Chose a method by clicking on "⨀ Monochrome" or "⨀ Full color" radio button .
⨀ Monochrome - This will make your text as mask layer on top of your background animation.
⨀ Full color - Full color allows you to have the single color text on top of the background animation.
09 You can change the direction by clicking on "⨀ Vertical Scrolling" or by clicking on "⨀ Horizontal Scrolling" radio buttons . If you select the "⨀ Vertical Scrolling" , You have to move the "Horizontal position" slider all the way left in order to see the text" .
10 If you are not using a background animation you can select a background color by checking "Background Color" check box . Select a background color by clicking on "Background Color"
button and selecting a color from the palette .
Click "OK" button after your customized your text effect. Now click record the text effect [How to record in LEDEdit-K]. Export the effects to your SD card and plug it into your controller [How to export LED Effect in LEDEdit-K]


No comments:
Post a Comment