 You can split the pixel led layout into different sections and record videos or animations in each section in LEDEdit-K version .This is one of the most useful features of LED Edit software .You don't have to redesign the animation or the video files to get the split effect from your layout .With this feature you can split the screen into different sections and play videos in each section at the same time. In other words simultaneous video playback of different areas of the layout .you can split the layout as much as possible .Best part is that the split screens that you create are not permanent which means you can change the split screens anytime you want .
 If you are new to LEDEdit - K software . Please checkout the [LEDEdit-K Basics Tutorial] .In this tutorial I'm not going in to the basics of LEDEdit - K such as creating new project , creating a layout , Recording/ Programming , Editing and exporting . Please refer to that article before proceeding .
Watch This Tutorial on YouTube
1.0 Create a new project .
 |
| LEDEdit-K Pixel LED Layout |
3.0 Go to the program tab and select the program from the list .
 |
| LEDEdit-K Tab navigation buttons |
CREATING A SCREEN

In order to create a screen or split the layout you need to select the section (square or rectangle shaped area of the layout ) that you need from your layout . When you are selecting an area using the mouse cursor you are start from a point which is the starting point and you leave the mouse button at the end of the selection that is the end point .In LEDEdit - K the pixel led at the start of the selection is called End pixel . These are the two pixel LEDs that we need the coordinates of .There are two ways to select the section from your layout .
SELECTING USING MOUSE

To select a section using mouse cursor move your mouse cursor on top of the start pixel and press and hold "Ctrl" of your keyboard and click left mouse button then move the mouse cursor to top of the end pixel (While holding pressed "Ctrl" button) and click right mouse button .which will create the section Automatically.
SELECTING USING COORDINATES
How to get the coordinates ?| Pixel LEDs on Cartesian coordinate system |

 |
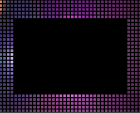
| Layout split diagram |
But for large layout you need to create your own diagram and get coordinates of start and end pixels ,Make sure to include the zero by zero coordinates .The diagram shown above is how I plans to split my layout into four equal sections .
4.1 Click and check "☑ Enable the split screen" check box.
5.0 Input the start and end pixel X and Y coordinates in the text fields under "Setting parameters" .

Start_X - [The start pixel X coordinate]
Start_Y - [The start pixel Y coordinate]
End_X - [The end pixel X coordinate]
End_Y - [The end pixel Y coordinate]
6.0 Click on "Add screen parameter" button .You will see the section that you created highlighted in red color .
RECORDING
 |
| LEDEdit-K setting screen list |
8.0 Use the time slider or the frame slider to select the frame that you wants your recording to be started.
 |
| LEDEdit-K screen recording |
10.0 Now click on "Record" to record and then "Stop Record" to stop the recording or use "Fast record video " button to record the entire animation or video automatically .
To switch the sections , Go back to "Screen" tab and select another screen or section from "Setting screen" list and comeback to "Effect" tab and continue from above step 8.0 .
SIMULTANEOUS PLAYBACK

Simultaneous video playback is when videos or animations in different sections of the layout plays at the same time . To record a video or an animation to be played at the same time ,We need to record each section separately but in same timestamp .
11.0 In the "Screen" tab , Select the first screen that you want the video to be recorded then go to the "Effect" tab .
12.0 Go to the frame that you wants the recording to be started using the frame slider .
13.0 Open a video or animation by clicking on "Open video" button .
14.0 Now click on "Record" to record and then "Stop Record" to stop the recording or use "Fast record video " button to record the entire animation or video automatically .
15.0 Go back to "Screen" tab and select the screen or section that you wants the simultaneous video with the first screen from screen list and comeback to "Effect" tab.
16.0 Go to the frame that you choose in the above 12.0 step, Using the frame slider . follow above 13 ,14 steps .If you want another simultaneous video playback section to be recorded follow the above step 15 .


1 comment:
Good tutorial ! Thanks !.
Post a Comment