 |
| LED Edit-K Online Control Tutorial |
LED Edit-K software is a special version of LED Edit software that is designed for "K" version Pixel LED controllers. These controllers are designed to operate both online and offline. Ex - T-300K ,T-400K ,T-500K,T-600K , etc .But also supports few of other controllers like T-1000 controllers . In my previous articles, I have talked about offline side of this software .In this tutorial we are going to look into the online side of this software .In order to use this software in online mode we need a controller that supports Online control such as T-300K ,T-400K ,T-500K,T-600K . I'm going to use T-400K controller for this tutorial .Please checkout my article on online mode of T-300K controller [HERE] . .I'm going to use LED Edit-K 2018 ( v3.53.1 ) version in this tutorial . If you don't have the LED Edit-K Software ,Please download the latest version from below .
Creating a New Project
01 Start your LED Edit-K software and click on "File" and choose "New" to create an new project .This will show up the new project window .Select the controller that you about to use from the "Controller Type" list and type the maximum number of LEDs you about to use per port in the "Max number lights of port" field (The amount you choose will cause automatic port change as it exceeds the maximum amount you given) when you creating the LED layout.Please check your controller user manual for the maximum number of lights per port .
02 Click on "Browse" button and select a location to save the project and click "OK". Click "OK" again in the "New Project" window.
Creating LED Layout
Now we have created our
LED Edit project ,It's time to create a LED layout .LED layout is the
representation of physical layout of your LEDs .In this tutorial we will
discuss how to create a panel like LED layout for the simplicity . In
this tutorial I'm going to use LED Edit's "Automatic layout creator"
option to create a simple LED panel layout .If you want to see how to
create custom LED layouts click the links below .
[How to create custom LED layouts in LED Edit - K software BMP Method]
[Click Here To See - How to create custom LED layouts using AutoCAD software].
 |
| Automatic layout creator tool icon |
01 If you are using LED Edit 2018 (v4.0) Click on "Edit Layout" in the left side panel .Which will take you to the layout editor window .Click on "Automatic layout creator tool" icon in the top menu bar . This will show the "Automatic layout creator" window .If you are using ( v3.53.1) click on "Automatic layout" Icon on the side panel ( As shown in above image) .
 |
| LEDEdit-k Automatic layout window |
02 In the Automatic layout creator window select a Led connection type by
click in on the "LED connection type " drop down list (You can choose
whatever you like) .Type the amount of LEDs you about to use in width
side in width side text field and height side in height side text field .
Click "OK". Now click anywhere in the work space to place the led panel
you just created .Now close the layout editor window (If you are using v4.0).
 |
| Automatically generated panel |
Click on "Settings" in the top menu bar and select "Controller Settings" .In the controller settings window. Select the control chip of the LED Strip/String you are about to use.Using the control chip drop-down list .This window will also allows you to change channel order , choose the type of LEDs you are about to use , change the white levels ( If supported) , Brightness adjustment for each channel and current settings for chips . you can play around with those settings to understand how they work .Then click "OK" .
 |
| LEDEdit-K Controller Settings Window |
Programming
We have created our LED layout . Now it's time to program or broadcast a video or an animation live. You
need to connect the LED controller to the PC and setup your PC network
adapter settings . Please refer to my previous article [HERE] . When it comes to online control there are several methods to go online.
01 Click on "Program" tab then click and check "Real-time" Display at the bottom of the panel.
 |
| Real-time display check box in program tab |
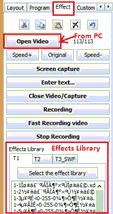
02 Click on "Effect" tab , you have several options .you can select an effect form the effect library or chose a video or an animation from the PC .I'm going to use a animation in my PC to do so ,Click on "Open Video" and browse and select the animation or the video file and click on "Open".
03 Now you will see the animation or the video is being played on the work area ,If everything is OK ,You will see the animation or the video is playing in the physical display .
04 If you wants to check the network status click on "Settings" and select "Open Network monitoring panel" where you will see the status of each controller is listed in front of controller ID.If everything is OK you will see "Connected" or you will see "Disconnected" .Check your cables and network setup if you didn't get any positive results .
04 If you wants to check the network status click on "Settings" and select "Open Network monitoring panel" where you will see the status of each controller is listed in front of controller ID.If everything is OK you will see "Connected" or you will see "Disconnected" .Check your cables and network setup if you didn't get any positive results .
05 To change a video or animation simply follow the second step again .If you need to stop the animation simply press the "Close Video Capture" button .
Screen Real Time Play
01 Click on "Program" tab then click and check "Real-time" Display at the bottom of the panel.
02 Click on "Effect" tab and select screen capture ,A small window with a red mask which is slightly transparent will appear .That transparent area is what you going to share or display in the physical display . This window can be -
Moved - Left click on the window top title bar and drag your mouse and leave your mouse button when you move to the preferred position .
Resized - get your mouse cursor on top of the border ( you will see the cursor icon changed to resize cursor ) then left click and drag your mouse until you gets the size you wanted . you also can equally resize by click on the corners and dragging the mouse .
03 If you need to stop the animation simply press the "Close Video Capture" button in the right panel .
That's it ,This is how you use LEDEdit-K software to work with online controllers .


5 comments:
Hi sir. Sir how I can use T300k controller. Plz help me.
What do you wants to know about T300K pixel LED controller /
can we use it for lived control?
their site says we can not
Yes ,You can . But , You need a Pixel LED controller with live control capabilities .
t300k, t400k should have those capabilities right?
Post a Comment