In this tutorial I'm going to discuss how to use LED Edit software's manual layout creator option to create text LED layout for your program. I have discussed the use of LED Edit's Manual layout creator to create a panel and irregular shaped led layouts .Some times we have to design led displays in text shaped Pixel LEDs . In this tutorial I'm going to discuss how to use LED Edit's Manual layout Creator to design text shaped layouts .This tutorial is for "LED Edit" versions not for "LED Edit -K" software versions .I will add tutorials for that software versions in future .
WATCH THE VIDEO TUTORIAL
I will discuss how to design some text shaped layouts.First of all you need to create a new project .Please follow the section of "Starting a New LED Edit Project " section in my previous tutorial [Click Here].
01 Click on "Project Config" in the top menu bar and select "Start Manual Layout" .This will bring up the manual layout designing window .
02 Click on "Text Production" in the top main bar and select "Input Text" from the drop down list.This will bring up the "Input Text" window.
Input Text window
03 Type the text you want as LED layout in the text box .Click on "Font" to view the font Settings.
Font settings
04 Select the font , font style and size from the lists and click "OK" . The text in the text box will change to the font settings you have selected .Now click "OK" in the "Input Text" window. Click on any place in the worksheet to place the text layout you just created .
led text layout
As you can see in above image ,You will see some missing details , excess LEDs and combined characters in your led text layout .we need to fix this before wiring the LEDs .we have to delete excess LEDs , Add missing details and separate combined characters in the led text layout . I will demonstrate how I fixed above led text layout .
Tool Names
05 First character "H" is fine but the second character "e" have excess LEDs ,Lets remove them .Click on "Selection" tool icon and start selecting the excessive LEDs one by one and the click on "Delete LED" tool to delete the selection .If you have mistakenly selected other led's click on "Deselect" tool to deselect the selection and then re select the LEDs that you want to delete and click on "delete LED " tool.
Fixing character e
06 Second and 3rd characters are combined together .we need to separate it ,Uunfortunately we don't have move tool in the manual layout editor .So this is how we move things in manual layout editor.First click on "Selection" tool and click and hold while dragging the mouse covering "H" and "e" characters to make the selection then release it .Now you have selected "H" and "e" .Click on "Cut" tool and then "Paste" tool now move your mouse cursor to place the characters in the right place, As soon as it comes to the place that you wanted ,Right click your mouse once to place it .
cut & paste tools
Separating characters
Doing the same to the last character -
Separating characters
07 We have one final thing to do , Adding missing details in the last character .To do this click on any of "LED Creator" tools and click in the places where LEDs are missing .this tool will create the connection between the leds you are creating ,we don't need that ,just ignore it while placing LEDs ,But after placing LEDs click on "Quick Delete Connection" tool then click and hold while dragging the mouse cursor creating the selection in the area that you placed the LEDs to delete the connections .
Adding missing details
08 Now we are done fixing our text layout ,Now we have to make the connections .We can do this by manually using the "Line" tool but it's a waste of time .I'm going to use "Auto LX" tool to make connections .Please refer to the "Auto LX Tool" section in my [LED Edit Manual layout Creator Tutorial],To understand how to use it .Here is my plan for "Auto LX" Tool .I'm going to do character by character and connect all them together .
Character "H" connection plan
Character "H" Auto AX tool connection
Section 1 - Left into
Section 2 - Top right
Section 3 - Connected Using Line Tool
Section 4 - Top right
Section 5 - Right into
Now connect each section in series using the line tool .
Connect each section in series
For character "e" it's hard to use "Auto Ax" tool ,So I'm going to manually connect leds together using line tool .
Character "e" manual connection
Note that the character e's in is close to character "H" and character e's end line is close to character "l".Also note that characters are wired in a such a way that it take minimum amount of wires .These are the main points you need to follow when connecting LEDs together .This is done because the Pixel LED's comes in strings or strips that they don't have much distance between each LEDs .
For the two "l" characters I used "Auto LX" tool then selected "Top left" and select whole "l" characters one by one .
Character "l" AutoLX connection
For the character "o" I used the manual method because it's hard to do it from "AutoLx" tool .
Character "O" manual connection
For the character "!" I used "Auto Lx" tool in "Top right" connection method .
Character "!" Auto AX connection
09 Now we are done connecting LEDs in each character ,Now we must connect each character in series .
I used connection or line tool for that (Connect each characters end with next characters in) .Here is the outcome -
Series connection between characters
10 Now we have to connect this LED Text layout to the port .Create a port next to the "H" character using "Port Creator" tool and click on the place in the sheet that you want to place it .To connect the port to the LED Text layout ,I used the line or connection tool to connect them by click on port once and click on the in LED of the character "H" .for more details of port please refer to "Connecting to the port" section of my [LED Edit Manual layout Creator Tutorial]
Connecting the port to the LED text layout
11 Now we are done creating our led text layout .Click on "File" and select "Save" choose a path and give a name to the file and click "OK".
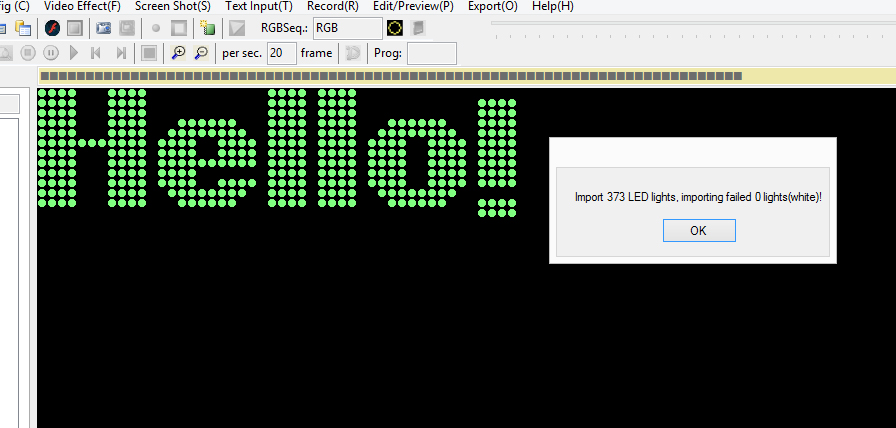
12 Now close the "Manual Layout creator" window and go back to the LED Edit main window.Click on "Project Config" and choose "Import (.cxb) " and Browse and choose the file we just created and click "OK" .If you get message like "Import ___ LED lights , Importing Failed 0 lights " . you have success fully crated and imported your layout .But if the failed lights are greater than 0 you have bad connections .please refer to the "fixing the bad connections" section of my [LED Edit Manual layout Creator Tutorial] for more details .
Imported .cxb file
Go to my previous tutorial from ([Click Here] and continue from the subsection titled "Recording a Video or an Animation" to apply a video or an animation to our layout .
Hi Sir. My name is AbdeAli from India. Your posts have really helped me a lot to learn led edit. I have started programing T-1000s controllers and it has helped me start a business. So THANKS a lot Sir. Sir now please show us a way by which we can protect our programs from being copied from sd-cards as the common re-salers are copying and selling my work. Sir please help.
Sorry there is no protection since the SD card can be accessed by anyone . You need to look into creating your own controller to do protect your work .


2 comments:
Hi Sir. My name is AbdeAli from India. Your posts have really helped me a lot to learn led edit. I have started programing T-1000s controllers and it has helped me start a business. So THANKS a lot Sir.
Sir now please show us a way by which we can protect our programs from being copied from sd-cards as the common re-salers are copying and selling my work.
Sir please help.
Sorry there is no protection since the SD card can be accessed by anyone . You need to look into creating your own controller to do protect your work .
Thanks !
Post a Comment