We all know windows 10 is one of the most used operating systems available today . However , If you tried to install and use LEDEdit 2014 or any older versions of LEDEdit in windows 10 you will eventually run into problems .It's almost impossible to use previous versions of LEDEdit in windows 10 . Since , most pixel LED controllers will only works in these old software versions . This is a major problem . After much research and trails .We realized there is one simple and fool proof solution to this problem . Here in this article we are going to discuss how to use LEDEdit 2014 or previous versions of LEDEdit in Windows 10 .
Why Old LEDEdit Doesn't Work on Windows 10
You may have seen the "Class not Registered" error when trying to use LEDEdit 2014 0r previous versions of LEDEdit in your windows 10 PC . This is the most common error we noticed when trying to run the older LEDEdit software versions in windows 10 .
Why - This error occur when a software failed to register .It's usually due to unregistered ".dll" files within the app or program . This is a compatibility issue . Because , Previous versions of LEDEdit software uses old dot net framework (Dot net 2.0) . This rises the issue . Even you were able to install the least dot net version that supported by LEDEdit , You wont be able to overcome this error . So , There is not much we can do in the windows 10 .
Watch This Tutorial on YouTube
• You can directly connect the SD cad to the virtual machine . This method sometimes doesn't work .
Solution For LEDEdit Doesn't Work on Windows 10
This is the only foolproof solution that will work 100% . The only solution is to install windows XP virtual machine in your windows 10 operating system . The benefit of this method is that you don't have to partition or format your hard disk . You can simply create a virtual machine like you install a program .From now on we are going to talk about how to install a virtual machine and how to use LEDEdit on that virtual machine .
Watch This Tutorial on YouTube
Installing Virtual Machine Software
To create a virtual machine you needs a virtual machine software .There are many . But, for simplicity of this article we will mention about a one in particular . For this tutorial we are going to use VMware software as our virtual machine software .Because , It's simple and easy to use . Here is how to install VMWare software.
 |
| VMware Software Installation Steps |
• Download VMWare 15.5.0 . For this tutorial we are going to use an old version of VMware (Version 15.5 ) . Or you can download the latest version of VMware from the Official site .
• Double click on the setup icon . If asked your permission click on "Yes" . Click "Next" .
• Read the user agreement and check "I accept .... " . Click on "Next" .
• If you don't like the default installation path , Click on "change" and select the installation location.Click on "Next" .
• Check or uncheck the permissions given to VMware software and Click on "Next" .
• Check where you wants the shortcuts to be placed . Click on "Next" .
• Click on "Install" .
• Once installed click on "Finish" .
Creating Windows XP Virtual Machine.
• Double click on the VMware desktop icon .
• Click on "File" and select "New Virtual Machine" .Which will start the virtual machine wizard .
• In the virtual machine wizard check "Typical" option and click on "Next" .
• If your source of windows XP bootable is a disk , Insert the disk to the drive and check the "Installer Disk " . Then select the drive letter of the drive from the drop down list .
• If your source of windows XP bootable is a image file , Check "Installer Disk Image File (iso)" . Click on "Browse" and select the image file .
• In the next window you will be asked for the windows key . Input the key (Case sensitive) .
• If you wants to create a user account upon windows setup enter the user account name and password .
• Click on "Next" . In the next window type the name for your virtual machine and select a location for the virtual machine by clicking on the "Browse" button .
• In the next window you will be asked how much you will allow the virtual machine to expand . Type the maximum amount you can allow in the "Maximum disk size : " field .
• Check "Store Virtual Machine as a single file" . Then , Click "Next".
• In the next window click on "Customize Hardware" . Using this feature you can allow more RAM , Processor and Graphic memory to your virtual machine. The values you select for each hardware should depend on the capabilities of your real hardware. We recommend these settings . However , More you allow faster your virtual machine .
Memory - 2048 Mb
Number of Processor - 2 | Number of Cores for processors : 2
Display / Graphics Memory - 1 GB
• Once you tweak the hardware settings . Click on "Close".
• Click on "Finish" .
The virtual machine will boot automatically to the windows XP setup . It will automatically install windows XP in the virtual machine . Just sit and watch . Once installed the virtual machine will reboot to the installed windows XP OS.
Installing LEDEdit in Windows XP Virtual Machine.
Now you can do almost anything in the virtual machine. Installing LEDEdit is one of them . Here is how to install LEDEdit 2014 in the virtual machine.
• Right click and select copy on the LEDEdit setup file or folder that contains that setup .
• Go back to the VMware window and click on the windows XP virtual machine.
• Go to the location in the virtual machine where you wants the setup file or folder to be pasted .
• Right click and select "Paste" .
You can also drag the file or the folder from windows 10 and leave the mouse button on the virtual machine window . It will be pasted on the location that was opened in the virtual machine when the file was dropped .
• Now double click on the setup file and install the LEDEdit software as you do in the normal computer .
• Once installed double click and run LEDEdit on this virtual machine .
• Create a new project , Create a layout , Program it and Export the effect file in the virtual machine. If you are new to LEDEdit follow these tutorial on how to do it.
- Programming pixel LED in LEDEdit .
- Programming pixel LED in LEDEdit-K.
Getting The Effect Files
• Now its time to transfer or copy the effect file(s) to the SD card . You have two option when it comes to transferring files from virtual machine .
Copy and Paste
• As we done when copying the LEDEdit setup file to the virtual machine we can do the same and copy the effect file(s) from the virtual machine .
• Go back to the windows 10 PC and paste it in the windows 10 .
• Once the effect files are in the windows 10 you can insert the SD card to the card reader and move the file to the SD card .
Connecting Card Reader to Virtual Machine
 |
| Connect the SD card to Virtual Machine |
• Connect your SD card or Insert the SD card to the inbuilt SD card reader .
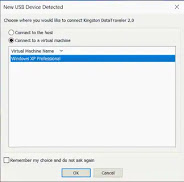
• You will see this dialog . Asking where you need this connected device available on .
• If you select "Virtual Machine" and select the windows virtual machine from the list then click "OK", The device will only available on virtual machine . The USB storage device will appear in your windows explorer . If the device not appear , remove and re-plug the card reader or insert the SD card into the inbuilt SD card reader .
• Now you can directly copy the effect files to your SD card .


No comments:
Post a Comment