New LED Edit software is out. So many new features and functions has been added. So, we decided to create a new LEDEdit 2021 software tutorial .Since it's first release back in 2012 a lot LEDEdit has been changed.LEDEdit versions discontinued after 2014 release .But ,There where some 3rd party modified versions such as LEDEdit 2018.After 2014 , Started to release the LEDEdit -K software with new interface and focusing on K series pixel LED controllers.However, New LEDEdit 2021 version have features of both LEDEdit and LEDEdit-K software versions.Here is the tutorial of LEDEdit 2021.
If you don't have LEDEdit 2021 installed in your system yet. [ Here is how to install and LEDEdit 2021 download links ] .
Watch The Video Trutorial
Creating a new project
The first step is to create a new project .
Double click and run the LEDEdit . In the LEDEdit interface Click on File and select NEW or click on the new project button in the top bar .
 |
| LEDEdit 2021 New project window |
In the new project window select the controller from the left side panel .In the parameter section type the amount of pixel LEDs you are about to connect to a single port in the "Max number of lights" text input field.
Click on Browse button and select a path , If you want to save the project in a different location and file name.Then , Click OK .
Creating a layout
The next step it to create a LED layout . LED layout is how you place your pixel LEDs in physically . There are various shapes and arrangements of the pixel LEDs (Layout) . It depends on your needs . It can be a panel display square or rectangular in shape , It can be a round shaped display , It can be a text layout shaped or it can be just a line of pixel LEDs. For this tutorial I will show you how to create a panel layout that is square or rectangular in shape.
Click on the Edit Layout button.In the Edit Layout window , Click on the ⚙️ gear wheel icon in the top tool bar .
 |
| LEDEdit 2021 Automatic layout window |
• Connection Pattern : This is the pattern how each pixel LED connects .Choose a pattern that is easy for you .However , The pattern you select here should be the connection pattern of your physical product.
• Width : Type the amount of pixel LEDs along the width of your panel .
• Height : Type the amount of pixels along the height of your panel.
• X Interval : This is the space between each pixel LED along the x-axis in the layout.(Doesn't affect the physical product)
• Y Interval : This is the space between each pixel LED along the y-axis in the layout (Doesn't affect the physical product)
• Max Number of Pixels per port : Input the amount of pixel LEDs you are going to connect to a single port (This should be less or equal to the number of pixel LEDs per port supported by your controller)
• Starting position : There are two options , Start from the current position or start from the next blank port. Start from the current position means the first LED of the layout you are about to create will be connected to the last LED of the previous LED layout (If there is any). tart from the next blank port means the first LED of the current layout that you are about to create will be connected to a new port.
Once all the inputs been given . Click on OK and click any where on the workspace to place the layout. .
If you wants to save the created layout for future use , Click on File and select save as and select a location and give a file name .Then , Click on Save .
Now close the layout creator window . You will see the created layout appear in the LEDEdit workspace.
Programming
In LEDEdit programing means recording videos or animations and editing them. Most pixel LED controllers supports up to 16 programs .Single program can contain any amount of effects unless it exceed the capacity of the SD card supported by the controller . The main purpose of having different programs is that you can switch it through them and play them as you want by pressing Mode button of your pixel LED controller.
Click on program tab in the left panel . As you can see in the list , The first blank program already been added to the list . Here are the button functions.
 |
| LEDEdit 2021 Program Tab |
Top buttons
 |
| LEDEdit 2021 Program Editing tools |
Cut - Cuts the effects recorded in the selected program in the list.
Copy - Copies the effects recorded in the selected program in the list .
Paste - Pastes the effects copied or cut previously and paste on the selected program in the list.
Delete - Deletes the effects recorded in the selected program .
Undo - Undo the last preformed action.
Bottom buttons
Add Program - Creates a new program .A pop-up will appear. Type a name (any name) and click "OK".
Delete - Click to delete a program from the list .
Up - To move up the selected program in the list.
Down - To move down a selected program in the list,.
Clear Recorded Effects - To clear the recorded effects in selected program.
Recording
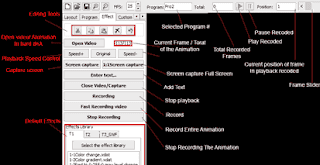
In LEDEdit programming means recording a playback of an animation or a video .Select your program that wants to record and click on Effects tab on the left side panel.
 |
| Recording video or animation |
Click on the image to know the functions of the buttons in the Effects Tab.
First you need a video or animation file .You have three options .
• Selecting a video or animation in your hard drive by clicking on Open video button.
• Selecting a animation from the list of default animations from the "Effects Library" in the bottom left .
• Recording the screen by clicking on the Screen capture or Screen capture 1:1 buttons.
• Screen capture - Exit the full screen mode of LEDEdit by clicking on the Restore Down button(The button between minimize and close buttons) . Press the Screen capture button. A small window will appear . Scale and move it to the area in the screen that you wants to capture.You will see the playback of screen capture in your pixel LED layout.
• Screen capture 1:1 - This will not show any scalable window .It captures whats behind the layout in 1:1 scale .You can move and place the LED Edit 2021 interface to the area that you wants to capture or you can scale the window of the player in the background to the size of your layout .
Do one of above and you will see your animation being played in the right side of the window.
There are several options when it comes to recording .
• Recording a potion of the Video / Animation - Wait until the frame of the animation being played on the layout and press Record button. Then , Wait until the frame that you wants to stop the recording and press Stop Recording .
• Recording a full Video / Animation - Click on Fast Record Video button .It will automatically record the whole animation / video .
You can stop the playback by clicking on Close Video Capture button .
You can see how many frames being recorded in front of the "Total :" label .
To play the recorded click on the green ▶ (Play/Preview) button on the top tool bar. To stop the play of recorded click on the ▌▌ ( pause button ) next to it .
You can also click and drag the frame slider to go to a desired frame .
Editing
 |
| LEDEdit 2021 Editing tools |
There is no much to do in editing in LEDEdit . You can copy or cut frames and paste them any where in the time line .Also ,You can delete frames . You can do these by using the editing tools available in the top left of the left panel.
Cut
 |
| LEDEdit 2021 editing recorded - cut window |
End : Last frame of the set of frames that you are about to cut.
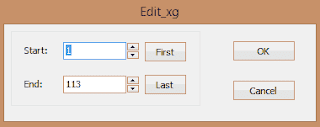
Copy
 |
| LEDEdit 2021 editing recorded - copy window |
End : Last frame of the set of frames that you are about to copy.
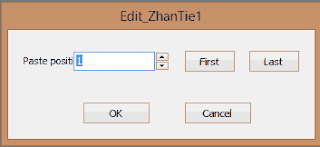
Paste
 |
| LEDEdit 2021 editing recorded - Paste window |
Paste Position : Position of the frame that you wants the copied or cut frames to be pasted next to.
Delete
 |
| LEDEdit 2021 editing recorded - Delete window |
Start : First frame of the set of frames that you are about to delete.
End : Last frame of the set of frames that you are about to delete.
Note : First button will input the first frame number to the input field and the Last button will input the last frame number to the input field.
Undo
Undo the last Edit action .
Exporting
Now we have finished our recording and edited the recorded scene .The final step is to export the content . Click on Export in the top menu bar .You have several options .Here what each function will do .
• Generate LED/ Bin files - Creates the effects .led file and other files related to the current project in your Documents folder.
• Generate and Export LED/ Bin files - Creates the effects .led file on a given location.
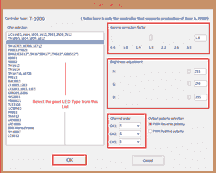
Selection of above both options will bring up the Export settings window .See the image below .
 |
| LEDEdit 2021 Export Settings Window |
Select the pixel LED chip (pixel led strip / string type) from the right side "chip selection" list of the window.
Use the Gamma correction slider if you wants to change the gamma (luminance or tristimulus) values of your .Low gamma values will result darker luminance and high gamma values will result brighter luminance .
You can adjust the brightness of each channel using the brightness adjustment sliders .Lower the brightness , lower the current taken by the pixel led strip or string.
If your pixel LED have different color channel order than R,G,B .Change the channel order using "Channel Order" drop down lists . E.g - If your pixel LED's color channel is G,R,B , Change the CH1: to G . Change the CH2: to R . (If you wants to know the channel order of a specific pixel LED ,Please refer to the datasheet of the pixel LED) .
Output polarity is the polarity of the output signal .(Please refer to the datasheet of the pixel LED to know the polarity of the signal ) . If datasheet doesn't mention about polarity try both options if one doesn't work.
Other Exporting Options
• Generate Layout file (.dxf) - Generates a "dxf" format layout file in a given location so you can use the same layout in future projects.
• Generate Layout file (.cjb) - Generates a ".cjb" format layout file in a given location so you can use the same layout in future projects.
• Generate Drawing (.bmp) - Generates a ".bmp" format drawing of the pixel LED layout in a given location for the reference when wiring the physical product.
• Generate 1:1 (.bmp) - Generates a ".bmp" of your layout with scale 1:1 (1 pixel = 1 pixel LED in your layout).
• Output Current Information - Creates a ".txt"file containing Controller type ,Project name , Path ,
number of controllers , total number of lamps used and how many pixel LED connected to each port.
There are few other things we didn't cover in this tutorial such as custom animation creator and Split screen feature . We will discuss these features in our upcoming tutorials .






17 comments:
Really well done for your site and all the information you have given us. I just downloaded lededit2021 and again this one does not work with my T8000. For three years I am garaging the new lededit and still not compatible. I bought my T 8000 Ac on AliExpress and I can only use lededit 2014, would you know why I am having this kind of problem? cordially
In the "Program" tab, I do not have the "real-time display" checkbox. Is it because the controller is not physically connected to the computer?
I don't have a controller on my hands yet.
I would like to display images on my LED strips in real time ...
In the "Program" tab, I do not have the "real-time display" checkbox. Is it because the controller is not physically connected to the computer?
I don't have a controller on my hands yet.
I would like to display images on my LED strips in real time ...
Hi,
When I run LEDedit, I constantly get an error "class not registered".
This is with almost every version (2021, 2020, 2019) in Windows 10.
Anyone have an idea???
Best regards!
Please Install Adobe Flash player . Download it Here
Adobe no longer supports Flash Player. So it can`t be downloaded. Any other solutions?
Yes but you can download the flash player from 3rd party sites .
Nice Post.
Is it possible to export hex files from Led Edit tool and control LEDs using arduino/node mcu?
Any suggestion ?
Thank you for your tip ..
If only T8000 controllers and LedEdit2021 software were compatible. T8000 controllers would sell out fast.
Hi , recently I bought K8000-CK Controller
I made program using led edit 2021
But not working
Can I have a solution pl?
Please , Try a different version of LEDEdit-k Software .Some versions doesn't support K8000-C controller . Or try every other K8000-C controller setting and try until you get it to work .
Sir Led edit 2021 supports T1000s and K4000 controllers or not
Yes LEDEdit 2021 still supports T-1000 Pixel LED controller . It also supports K-4000 pixel LED controller.
I have been searching. Search and download LedEdit-k 2021 the t8000is there I downloaded it yesterday
hi can lededit-K V8.9 work with T1000s driving a "ws2812 pixel matrix panel" ?? i try programming it but after copying the led files into the SD card, the controller seems not selecting the files. nothing happens
my T1000s is a black pcb inside with version: V1.1 and just having a single microcontroller (U1), 74hc245(U2) and 6n137 (U4)
Post a Comment