Watch This Tutorial on YouTube
Why Network Pixel LED Controllers ?
Let's take a example . Lets say I have a T-1000 pixel LED controller which is a single port pixel LED controller .This controller can only control up to 2048 pixel LED's using it's single port . Now , Lets say you have to program over 2048 pixel LEDs . Without networking you can go to multi port pixel LED controller (Eg- T-4000 , T-8000 ) .However , These multi-port pixel LED controllers are ten times more expensive than T-1000S pixel LED controller . This is where networking pixel LED controllers comes handy . You can network these inexpensive pixel LED controllers to create your pixel LED system without having to buy an expensive pixel LED controller like T-8000 .
The other advantage is that if you have a damaged controller in the network , You can simply replace the pixel LED controller that's damaged without having to replace them all .Simple and inexpensive . If you have used a multi port pixel LED controller , You have to replace the whole unit which is very expensive .
How to Network Pixel LED Controllers
Lets see how to network pixel LED controllers . For this tutorial I'm going to use Two T-1000S pixel LED controllers . With a custom animation we will show you how this system work as a one unit .
The Wiring
As we discussed in our T-1000S pixel LED controller tutorial . We need to connect the power and the pixel led strings or strip s to each pixel led controller in the network .
Power Supply Wiring - The controllers and the pixel LED strings / strips need to be connected to the power supply . You can use multiple power supplies .But , You have to use a common ground between the power supplies .If you are using a common power supply for the pixel LEDs and pixel LED controllers , You don't have to connect the data Gnd of the pixel led strip / string to the controller.
Pixel LED wiring - The pixel LEDs needs to be connected to the pixel LED controller through the data and clock terminals (depends on the type of pixel LED string / strip) . The wiring should be according to the pixel LED layout and wiring pattern .
Networking Controllers
How to Install LEDEdit 2022 v8.0
• Download LEDEdit 2022 from the link at the bottom of this page.
Example - Two K-1000C Pixel LED Network
In this example we are networking K-1000C pixel LED controlled together. Each controller is connected to a single WS2811 pixel LED string which contains 50 pixel LEDs . Here is the wiring diagram of the system.
 |
| T-1000S Networking - Wiring Diagram |
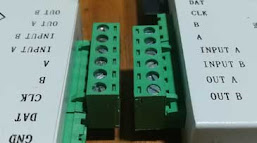
As you can see in the wiring diagram we are using a common power supply for both pixel LEDs and pixel LED controllers . The pixel LED strings only connects to the controller through the Data out of the controller . The first pixel led controller in the network called the master . The master pixel LED controllers OUT A connects to the next pixel LED controllers INPUT A and the master pixel LED controllers OUT B connects to the INPUT A of the next pixel LED controller . The same connection method should be used for the next pixel LED controllers in the network.
Programming
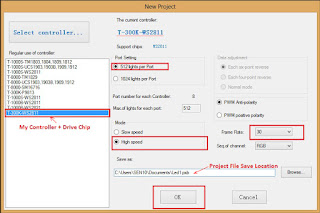 |
| Creating New Project LEDEdit |
Please Read our Tutorial on How to program pixel LED in LEDEdit . We will skip the basics . Start LEDEdit software .
• Create a new project . Select your controller and pixel LED from the list . Click on "OK" at the end .
Creating the Layout
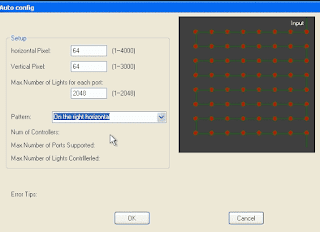 |
| LEDEdit Auto layout creator window |
Create the layout as you wish . Using the manual layout editor or Automatic layout creator . If you are using manual layout creator to create the layout , Create a port for every pixel LED controller in the network and connect the group of pixel LEDs in the layout to the particular port . Here are some of the related articles on creating pixel LED layouts .
Pixel LED Edit - K led layout design Tutorial
How to Create a Text layout in LED Edit
Design layout using LED Edit's Manual layout Creator
For this example we will create a 64 x 64 panel layout using the Auto layout creator .
• Click on "Project Configuration" . Then , Select "Auto Layout" from the drop down menu .
• In the Auto layout creator window . Type the amount of pixel LEDs along the horizontal and vertical axis of your pixel LED layout.
• Type the limitation of pixel LED controller in the "Max Number of Pixels for each port" input field .
• Select the connection pattern from the "Pattern" drop down list .
• Once all done , Click on "OK" .
In this example we have a 64 x 64 pixel LED which results 4096 pixel LEDs . Since , The K-1000C can only control up to 2048 pixel LEDs . The Automatic layout creator will create two separate ports .Each port represents a controller port (In this case two ports means two controllers) . Which means in this case a new controller in the network (Since , This controller have only one port). There is no connection between the two groups of pixel LED strings except for the power . Each pixel LED string groups data and clock lines will connects to the specific port of the controller . Above image shows the final layout of the pixel LED system.
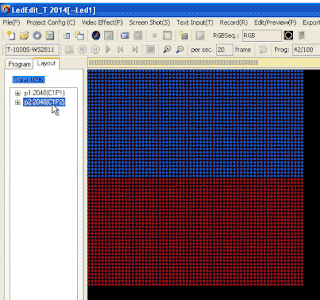 |
| LEDEdit Auto layout panel layout 64x64 |
Even though , This system have two separate sections It works as a single layout . The result is same as if you used a multi port pixel LED controller . No different , except for the wiring and programming .
Recording | Programming
It the same way you program your other pixel LED program . There is no difference .
•Open a video , swf ,tol animation or use a default animation by clicking on "Video effect" and selecting an option .
• Once the animation or the video is opened click on record button "Red dot" . Stop recording by clicking on the stop button "Green rectangle with white fill" .
• Once recorded , Edit the recorded by clicking on the Edit recorded button. Please refer to below article to know how to edit the recorded animation or video .
• More on Recording | Programming - How to program pixel LED in LEDEdit .
How to Program pixel LED in LEDEdit - K .
Exporting
 |
| LEDEdit Export window |
• Once your programming / Recording done you can export your pixel LED effect . Click on "Export" and select "Export LED Effect (.led)" .
• In the export settings window change the settings as you wish . Refer to below tutorials for more info on exporting .
How to program pixel LED in LEDEdit .
•After changing the settings , Click on "Export" .
• Select a location to save the LED effect files .Click on "OK" .
Copying The Files
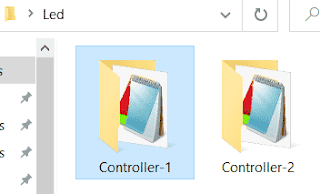
If you go inside the "LED" folder that LEDEdit software creates . There will be folders for each controller . With the controller number . Go inside these folders and copy the effect file inside the controller folder . Then , Paste it on the root directory of the SD card . Number the SD card .Eg - Controller 1 SD card should be labeled "1" and so on .. The Effect files should not be mixed .
Final Outcome
Insert the SD cards to the pixel LED controllers that they belongs to .E.g - The SD card that contains program for the controller one should go inside the pixel LED controller one . Once all the SD cards been inserted . Turn the power supplies ON . You will see the pixel LED system in work as a one unit. You can increase the amount of pixel LEDs in the system by adding more pixel LED controllers to the system.
Troubleshooting
Q . One pixel LED controller plays default pattern .
A - Check the SD card , Try a new SD card . If there are any reading issues , The error LED will blink .
Q . One pixel LED set is stuck .
A - Check the network jumper wires . Replace the controller .




No comments:
Post a Comment